Here I’ll show the easiest and most delicious way to whip up a salmon pasta salad!
Although this might seem like a side dish, it’s way too easy to make for a quick and easy dinner! Follow me…

Bagel Croutons
Where there’s smoked salmon, there’s often bagels. And where there’s salad, there’s quite often croutons. You see where I’m going with this  .
.
These are essentially my Bagel Chips, just repurposed as croutons. Really simple to make – just slice up a bagel, coat in oil and salt and bake until crisp. You’ll want to leave them to completely cool, just so they don’t warm up the salad and turn the dressing greasy. They’ll also crisp up as they cool.
Can I make these ahead of time?
Yes, just allow them to cool completely, then tightly store them at room temp.
Process shots: slice bagel (photos 1&2), bake (photos 3&4).

Salmon Pasta Salad Dressing
The dressing for this pasta salad is really simple and binds everything together so beautifully. Here’s what you’ll need:
- Sour Cream & Mayo – these create the base of the dressing. Make sure they’re both full-fat for a fuller flavour!
- Herbs – fresh chives and dill pair beautifully with the salmon and bring this salad to life.
- Lemon Juice – I like a good amount of lemon juice to balance out the rich flavours and brighten everything up.
- Mustard – a small amount of Dijon mustard adds a very gentle background flavour.
- Seasoning – some sugar will help balance the flavours. I like a good amount of black pepper to add a little ‘spice’. I only add a small pinch of salt as there are other salty ingredients in the salad.
Can I make this ahead of time?
Yep! Just tightly store in the fridge until needed.
Process shots: add ingredients to bowl (photo 1), stir to combine (photo 2).

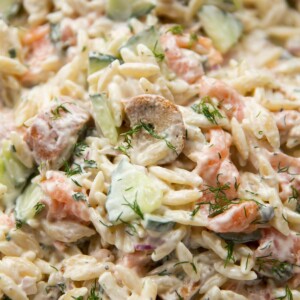
Smoked Salmon Pasta Salad
For the salad itself, I love using orzo. You’ll want to cook it until al dente, then drain and thoroughly rinse in cold water until completely cool. Make sure you give it a good shake to get rid of the excess water.
From there, here’s what you’ll need for the fillings:
- Cucumber – this is great to break up the other rich, saltier flavours.
- Red Onion – only a small amount because we’re already adding chives.
- Capers – these pair beautifully with salmon and add loads of flavour to the salad.
- Smoked Salmon – just roughly tear or slice.
- Dressing – as discussed.
- Croutons – as discussed.
It’ll seem quite saucy at the start, but the dressing soon starts to get soaked up by everything.
Process shots: add orzo, cucumber, red onion and capers to bowl (photo 1), stir with dressing (photo 2), add salmon and croutons (photo 3), stir to combine (photo 4).

Smoked Salmon Pasta Salad FAQ
Can I use fresh salmon?
I like using smoked salmon because it adds loads of flavour and doesn’t need cooking. You could cook some raw salmon (preferably smoked) then leave to completely cool and break up into the pasta if you’d prefer.
Can I make the whole salad ahead of time?
If you want to make it ahead of time leave out the croutons and store them in an airtight container at room temp, then stir in before serving. Keep the pasta salad tightly covered in the fridge.
Is there anything else I could add?
I think avocado would go nicely. I also toyed with cherry tomatoes, so you could try that if you fancy!

Serving Smoked Salmon Pasta Salad
The croutons actually hold up pretty well and stay crunchy for 30 mins or so, but obviously the sooner it’s served the better. If you have any leftover dill you could sprinkle that over to serve!
For another similar pasta salad check out my Tuna Pasta Salad!
For ALL my pasta salads check out my list of Incredible Pasta Salads!
Alrighty, let’s tuck into the full recipe for this salmon pasta salad shall we?!

How to make Smoked Salmon Pasta Salad (Full Recipe & Video)
Smoked Salmon Pasta Salad
#wprm-recipe-user-rating-4 .wprm-rating-star.wprm-rating-star-full svg * { fill: #343434; }#wprm-recipe-user-rating-4 .wprm-rating-star.wprm-rating-star-33 svg * { fill: url(#wprm-recipe-user-rating-4-33); }#wprm-recipe-user-rating-4 .wprm-rating-star.wprm-rating-star-50 svg * { fill: url(#wprm-recipe-user-rating-4-50); }#wprm-recipe-user-rating-4 .wprm-rating-star.wprm-rating-star-66 svg * { fill: url(#wprm-recipe-user-rating-4-66); }linearGradient#wprm-recipe-user-rating-4-33 stop { stop-color: #343434; }linearGradient#wprm-recipe-user-rating-4-50 stop { stop-color: #343434; }linearGradient#wprm-recipe-user-rating-4-66 stop { stop-color: #343434; }
Equipment
-
Sharp Knife & Chopping Board
-
Small Baking Tray
-
Large Pot & Colander (for pasta)
-
Small Mixing Bowl (for dressing)
-
Large Mixing Bowl (for combining everything)
Ingredients
Dressing
- 120g / 1/2 cup full-fat Mayo
- 120g / 1/2 cup Sour Cream
- 1 1/2 tbsp Lemon Juice
- 1 heaped tbsp finely diced Fresh Chives
- 1 heaped tbsp finely diced Fresh Dill
- 2 tsp Dijon Mustard
- 1/2 tsp EACH: Sugar, Black Pepper, or to taste
- 1/8 tsp Salt, or to taste (see notes)
Pasta Salad
- 1 Bagel, sliced into semi-circles
- 300g / 1 1/2 cups / 10.5oz uncooked Orzo (see notes)
- 200g / 7oz Smoked Salmon, roughly torn/sliced
- 150g / 5.3oz Cucumber, sliced in to small pieces
- 2 1/2 tbsp Capers
- 1/2 small Red Onion, finely diced
- Olive Oil or Oil Spray, for croutons
Instructions
-
Preheat the oven to 180C/350F. Add the bagel chips to a baking tray and spray or drizzle with oil. Toss in a pinch of salt then bake in the oven for 10-12 minutes or until golden and crisp. Leave to completely cool (they'll crisp up more as they cool).
-
Meanwhile, add the orzo to salted boiling water and cook until al dente. Drain and rinse with cold water until completely cool. Give it a really good shake to remove excess water.
-
As the pasta is cooking combine all of the dressing ingredients in a small bowl.
-
In a large bowl, combine the drained/rinsed orzo, cucumber, capers, onion and dressing. Stir in the croutons and salmon until everything is evenly distributed then serve and enjoy!
Video
Notes
b) Salt – I only add a small amount to the dressing as the capers and salmon add a good amount of salt to everything. You can adjust with more salt after everything has combined if you’d like.
c) Orzo – I love using orzo for this recipe, but you could sub other small pasta like macaroni. If you are, work to the weight comparison (i.e. 300g / 10.5oz)
d) Salmon – I like using smoked salmon because it adds loads of flavour and doesn’t need cooking. You could cook some raw salmon (preferably smoked) then leave to completely cool and break up into the pasta if you’d prefer.
e) Consistency – There will be a fair bit of dressing at the start but as you mix everything it gets soaked in.
f) Make ahead – If you want to make it ahead of time leave out the croutons and store them in an airtight container at room temp, then stir in before serving. Keep the pasta salad tightly covered in the fridge.
g) Calories – Whole recipe divided by 4.
Nutrition
The post Smoked Salmon Pasta Salad appeared first on Don't Go Bacon My Heart.


 . Follow me…